Fixes and Trouble Shooting Also See Trouble Shooting Chart at bottom of this page for more details.
The following are some simple solutions for some issues we have had on a very small percentage of units.
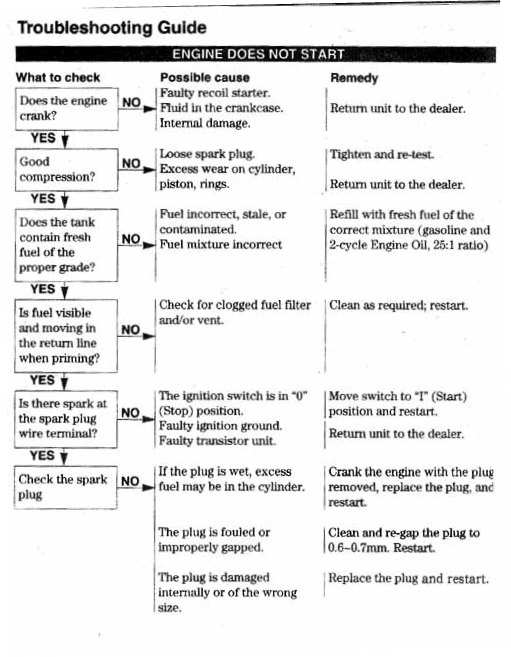
1) Unit does not start . If your unit is not starting easily, does not start, or cuts out during operation, it is often caused by a fouled spark plug - even if the plug looks good or has not been used much. Changing the plug may save you a lot of time. Please review the starting procedure at http://multipowertools.com/support/indexmulticutter.htm#Tips but you can also check the following:
a) Is the
choke working properly? Remove the air filter cover. For a cold start, the choke
plate should be fully blocking the air intake when the lever on the side of the air filter
assembly is pushed up away from tank. The air intake should be not blocked when
the lever is pushed down towards tank after a few moments of warm-up.
b) Check the fuel lines are fully pushed onto the nipples on the carburetor. Did you prime the carburetor by pumping the primer ball at bottom of
carburetor until the carburetor primer bulb is firm? If the bulb does not get
full after pumping a few times, you may need to pull start chord a few times to
generate suction, then re-pump the primer bulb.
c) Did you check the stop switch in not in off position?
d) Do you have enough gas in the tank?
e) Do you have a good spark plug? A new plug is just a few dollars at a Home
Depot or similar (NGK BM6A equivalent), and may save a lot of time. With 2 cycle
engines, the oil in the mix will build up on the plug - especially if you unit
sits between uses. it can happen in a short amount of time. Even if your used
plug shows a spark, is recent, or has been cleaned, we would suggest having a
new one on hand to eliminate the plug as the problem. If you want
to check the spark ignition system, remove the plug from engine, connect the plug wire
to the plug and ground the side of plug to metal engine housing using pliers
with plastic grip handles so you don't get a shock. Pull the starter cord and
watch the plug for a spark jump. The spark should be bright blue and easy to
see. If you have a weak spark then the ignition system is
working but that does not necessarily mean that your plug is good. You may
need a new plug. If you have NO spark at all, see check #20 (No Spark at
All) below.
f) If you have all above working, last area may be mix screw out of adjustment. You can try and fix this by adjusting the carburetor fuel mixture screw (the one with spring). Try undoing the screw to open up the inlet (richer mixture) and allow more gas to blow through. If it starts, even just for a short time, move the screw a little bit and see if the different position helps. Once it is running you can turn the screw clockwise for a leaner mixture until you get better rpms at full throttle.
1a) Unit does not start or stops when hot. If your unit does not start when hot, you can check all the points in 1) "Unit Does Not Start" above but also read an check the points at http://multipowertools.com/support/hotstart.htm Simple things you can try right away:
- Take off your air filter cover and filter. Try starting and make sure choke is not blocking air intake
- Check that tank pressure buildup is not being caused by the vent valve on your fuel tank. Unscrew the gas cap about halfway and try to run your trimmer. If the vent is plugged, the loosened cap will allow these heated gases to escape.
- Make sure fuel lines are pushed fully onto nipples on carburetor.
1b) Engine stutters when you give gas or does not provide good high rpms. First get a NEW spark plug. Changing the plug may save you a lot of time and they are cheap. If that does not help, remove the air filter cover to make sure that that your choke is not restricting air flow. Also check the black fuel intake line for punctures inside and outside the fuel tank, and makes ure it is seated well on the carb. If that looks good, your fuel mix screw may be out of adjustment. You can try and fix this by adjusting the carburetor fuel mixture screw (the one with spring). Try undoing the screw a bit to open up the inlet (richer mixture) and allow more gas to blow through. It will most likely sputter at that setting if you try and give it gas. While running, move the screw in clockwise a little bit at a time and then give the engine gas and see if the different position helps give higher rpms. Once you get to a position that gives you good high rpms when you give full throttle, you are there. Engine must be warm and coke plate open (not covering carb intake) to do this.
Another thing you can check is that the carburetor and manifold are properly sealed against the engine. If not sealed, air will get into the fuel mix and degrade performance. With the air filter cover removed, remove the 2 bolts holding the carburetor and check the gasket on manifold and the rubber seal under the choke/air filter assembly. With carburetor off, also check and tighten the 2 bolts holding on the plastic manifold before you reinstall the carburetor. It is not necessary to put a new gasket if the current gasket is not torn.
2) Attachment Tube does not Click in Coupler. With brand new units it may be difficult to get the latch in the coupler on the power unit to click into the "click" hole on the attachment tube. You may find that it is not necessary to push the tube all the way into the coupler to get them clicked. Gently rotate and move in/out to feel where the latch will click. If the tube is pushed all the way into the coupler, and it is still not engaging, try rotating the tube from side to side a few times. When you pull out the tube again, you should see a little mark where the latch point was rubbing on the tube to give you a idea of where the hole on tube should be adjusted to. You can take a thin round file and gently file the edges of the click hole on the attachment tube see picture This connection will get easier as you use the unit. Do not use the heads until you have the latch on the coupler engaged in the hole on the tube.
3a) How are the Couplers and gearcases attached to the tube. For each gearcase and also for the coupler, there are 2 bolts that secure them to the tube. One is a short pin bolt that goes through the gearcase or coupler into the tube. The other is a clamping bolt that closes the jaws on the gearcase or coupler tighter around the tube. See http://multipowertools.com/support/coupler/index.htm for details. As long as the short bolt is inserted through the hole in gearcase and goes through hole in tube, the tube can now only move a very small amount until the bolt hits the side of the hole in the tube. To stop any movement, the longer clamping bolt is used to clamp the jaws on the gearcase or coupler tighter. If the little bolt on the side of the coupler spins in its hole, it will still perform the function of "pinning" the coupler to the tube on the power head. If your coupler was spinning on the drive unit tube, then you would have an issue with the coupler side. If your attachment tube rotates after the attachment tube is inserted in the other side of the coupler, and after the large black handle screw is tightened to "clamp" the coupler jaws on the attachment tube, this means that the latch on the coupler has not engaged with the hole on the attachment tube. You should hear a click when the latch is fully inserted into the right position. Once you have done that, then you can tighten the black handle screw to tighten the coupler jaws on the attachment tube. If clicked, the attachment tube should not rotate any more than the small space until the side of the hole hits the pin on the latch.
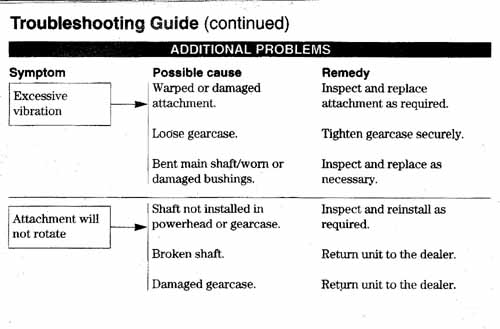
4) Hedge Trimmer Blades do not move but engine
can get to full revs. When using your hedge trimmer check to make sure
that the nut with cotter pin securing the bolt going through the articulating
elbow joint is not backing off or loose, and the the 2 joint halves are firmly
seated. The joint should be tight enough that there is no space between the 2
halves, but loose enough to allow the arm to articulate with light pressure. If the nut is not gently tightened up to eliminate play, the 2 halves of
the joint can start to move away from each other and the gears inside can lose
contact. A simple solution is to remove the cotter pin and tighten the nut by
one space, or put a few washers under the nut to reduce the play. You can also
just remove the existing nut and cotter pin and replace with a washer, lock
washer, and a 6 mm lock nut (the lock nut can work itself undone as you
articulate the head so make sure you check this often and use a thread locker on
the threads under the nut) .
Tighten the nut enough to eliminate play but do not over tighten. If the joint
is over-tightened, the blades will not move and the engine will struggle to push
the blades. Simply loosen the joint slightly. We have video of this at
http://multipowertools.com/Videos/multicutter/HedgeArticulatingJoint.wmv
If this does not help you can also inspect the gearing inside. Pictures of what
is inside are at
http://multipowertools.com/support/Hedge/gears.htm
5) Hedge Trimmer Blades do not move and engine is bogging down.
This is probably because some or all of the 3 bolts/nuts that hold your hedge
trimmer blades together are too tight. The washers on the bolt head side should
feel loose enough that they can be turned by hand. If the washers do not spin,
you will have to loosen the bolt. First, back off the nut by a turn. Then on the
other side of the blade, use a large phillips driver or vise grips to back off
the bolt head by a half turn. If the washers are loose, the bolt head position
is good. While holding the bolt head from moving, re-snug the nut, and then
re-check to the see that the washers will still spin. Basically, the idea is to
have a small space between washers and blade on the bolt head side to allow the
blades some room to slide against each other.
6) Hedge trimmer blade bolts getting loose. Make sure that the nuts is a lock nut (6mm), or put some thread lock compound on the threads and refasten the existing nuts.
7) Power Head Play. The engine head is attached to the tubing with a special rubber bushing (inside cone shaped clutch housing). The bushing is designed to dampen rotational force as you power up from idle to full speed and ease stress on the components. The engine head may rotate slightly on the tube as you throttle up. This is NORMAL and a function of the design. If you are concerned, click here.
8) How to Open Line Trimmer Spool. Read the section on replacing trimmer line here.
9) Pull Chord Locked, or Engine makes a squealing/clicking noise as engine turns over, or engine makes clattering sound then stops,. If the pull chord is stuck, your engine has made a clattering sound and then stopped, or if the engine is locked, first remove your pull unit (just 4 phillips screws) and with the pull unit removed, pull the chord and see if chord pulls out and retracts as normal. If the pull unit is ok and the pulley inside the pull unit is in good shape, then the pull unit is not the problem. Next, try to turn the engine over by turning the metal "dawg" pull catch flange (see pic at http://multipowertools.com/support/pullunitcatch/DSC01468.JPG ) that is attached to the engine and engaged with the pull unit. If the engine turns over easily, try re-installing the pull unit. If the engine still does not turn over, the 1st possibility is a material jam in the flywheel . You can see how to check this at http://multipowertools.com/support/clutchbolt The 2nd very rare issue may be clutch housing bolts that are slightly long. You can see how to check this at http://multipowertools.com/support/clutchbolt/index2.htm . T
10) Handle base is cracked. The handle base can crack if the 4 bolts are not tightened evenly. The base can be easily replaced with straps. See http://multipowertools.com/support/handlebase/ for details
11) Unit will not turn off. This is not usually a problem with the stop/start switch on the throttle trigger assembly. The leads from the stop switch on your throttle assembly are connected to the engine stop leads close to where the throttle cable meets the carburetor. It is possible that these could have been disconnected by getting caught on something, or not connecting well. The engine is stalled when the circuit is CONNECTED which means that if these leads are disconnected or not touching properly, the stop switch will not be able to close the circuit and kill the engine. It will not affect starting. You can temporally eliminate the switch by disconnecting the leads and then touching the 2 leads from engine together to kill the engine. Try checking the connection and see if this solves your problem. If not, you may have a poor connection inside your on/off switch.
12) How to Remove the drive shaft with clutch housing from the engine. See http://multipowertools.com/support/driveshaft/
13) How to Remove the throttle assembly from the drive shaft. See http://multipowertools.com/support/throttle/
14) How to Rewind a pull start unit (G2). See http://multipowertools.com/support/pullg2/index.htm
15) Unit runs at very high revs and will not idle. Most likely the throttle cable has pulled out of the seat on the carb and is sitting on the edge of the seat. If this is the case, the unit will not return to idle speed. This can happen if the cable has been pulled out of the seat during transport. Normally the spring tension on the throttle valve should keep the cable in the seat but it is possible to pull the cable out from the seat. This is easily corrected by simply re-seating the cable into the seat. You should notice the revs decreasing right away. This is not a clutch issue as any clutch failure would result in the unit not being able to spin the blades. The clutch is held in a non-engaged position by 2 heavy duty springs, and failure of the springs would also leave the clutch in a non-engaged position at idle.
16) How to remove covers and view CDI unit (transformer) . See http://multipowertools.com/support/cdiunit/index.htm
17) Replacing "Alternate" recoil start unit. To replace pull unit, remove 4 phillips screws holding original pull unit and remove unit. Slide screwdriver or similar from pull start side of engine into flywheel fins through slots in engine casing in order to block engine from turning. Make sure that the screwdriver is inserted into and butting against recess on flywheel and not just fin, or you may damage fin. While making sure that engine stays locked and flywheel does not bounce against screwdriver (to avoid impact damage to flywheel), gently unscrew (counter-clockwise as per normal) with vise grips or socket wrench, the existing metal flange on engine that interfaces with the original pull unit. After existing flange is removed from crankshaft, place 2 supplied washers on crankshaft and then screw on the new metal flange supplied. Block engine from turning with screwdriver again to get flange on snugly. The flange will screw on or tighten up against crakshaft anyway as you use pull unit anyway. Replace new pull unit with 4 phillips screws.
18) How to remove and replace a cylinder head. Please see http://multipowertools.com/support/Head-Piston-Replace/
19) Pull unit does not seem to engage engine when pulled. See http://multipowertools.com/support/pullunitcatch/index.htm
20) No Spark at All. If you have no spark at all, it is likely that the end contact under the boot that goes over and connects to the spark plug is the issue. For a quick fix, you might consider pulling back (or cutting) the boot and exposing where the coil-like "grip" joins to the flexible black spark plug lead. The coiled grip has a non flexible wire similar to paper clip wire, and the end of this wire is simply pushed through one side of the spark plug lead to make a contact, and then bent back where it comes out on the other side to keep it from pulling off. It is possible that the non-flexible wire has broken or pulled out of the spark plug lead . In this case, the non-flexible wire can be re-bent and pushed through the spark plug lead in a different point. The rubber boot can then be pulled back over the joint, or closed again with electricians tape.
21) Replacing Clutch. Remove engine from clutch drum (see http://multipowertools.com/support/driveshaft/ ) Slide screwdriver or similar from pull start side of engine into flywheel fins through slots in engine casing in order to block engine from turning. Make sure that the screwdriver is inserted into and butting against recess on flywheel and not just fin, or you may damage fin. Before removing clutch, note alignment of clutch wings and springs so that you can replace new clutch in same way. While making sure that engine stays locked and flywheel does not bounce against screwdriver (to avoid impact damage to flywheel), undo both bolts and thin washers holding on clutch and remove clutch. Replace in reverse.
22) How the replace a carburetor. Please see http://multipowertools.com/support/carb/index.htm
23) How to change/attach a tube on the attachments See http://multipowertools.com/support/Hedge
