Quick-Start for the YardShape 4-in-1 Multi-Cutter - Expanded Instruction Manuals, Tips, Troubleshooting
PDF version Manual Box Contents How-To Trouble Shooting Specifications Main Site Warranty Details
1) Power head, strap, handle
2) Line/Brush trimmer attachment, line spool with nylon line, metal brush blade, plastic debris guard
3) Hedge trimmer attachment with 2 plastic blade covers (attachment tube may be shipped unassembled - see #6 in Pre-Use Assembly below)
4) Chainsaw attachment, chain bar, and chain
5) Mixing bottle to mix gas with 2-stroke oil (1:25 or 1 part oil for 25 parts gas), instruction manual
6) Tool set which includes:
| Qty | Description | purpose |
| 1 | plastic handle backing | handle for power unit |
| 4 | 1" bolt (5mm thread )and nut set | handle for power unit |
| 4 | 3/4" bolt (5mm thread )and lock nut set | line trimmer debris guard |
| 1 | metal cutting blade and screws | line cutter for debris guard |
| 1 each | spanner wrench, spark plug wrench with screw driver, small hex wrench, large hex wrench | tools |
Pre-Use Assembly/Prep required:
1) If not already attached, attach handle (optional) to power head unit (4 bolts - 5 minutes). See http://multipowertools.com/support/handle/ for details.
2) Attach plastic debris guard ( optional) on plastic base on line trimmer/brush cutter head (4 bolts - 5 minutes). See http://multipowertools.com/support/debrisguard/ for details.
3) Screw on your choice of line trimmer or brush cutter head. Parts for attaching brush blade are already on head. Reverse thread means screw on ANTI-CLOCKWISE! (2 minutes).
See http://multipowertools.com/support/ChangingTrimmer-Brush.htm for details.
4) Attach chainsaw blade and chain. See http://multipowertools.com/support/chaininstall for details. Fill reservoir with any bar and chain oil. (5 minutes)
5) Connect your favorite attachment (15 seconds) (see Tip #2 below)
6) Usually the units ship with the extension tubes attached to the cutting heads but, If the unit has shipped with a tube separated from the attachment head to save space, please see http://multipowertools.com/support/Hedge/index.htm for details on how to attach.
1) Starting and Running. See http://multipowertools.com/support/starting for pictures/details. Please note that gas:oil ratio is 25:1. Use the included mixing bottle to get the right ratio.
a) Make sure to turn on the cut-out switch prior to trying to start. Push towards engine to turn on. The orange "start-assist" button next to the stop switch allows you to "lock" the trigger in a slightly higher than idle position. With the throttle trigger in a fully pressed position, hold in the orange button and slowly release the trigger. The trigger should stay in a slightly pressed position, providing a little extra gas for starting. Press trigger again to release.
b) Prime the carburetor by pumping the pump ball on base of carburetor until gas can be seen pumping through clear line or bulb is firm. If the bulb does not get full after pumping a few times, you may need to pull start chord to generate suction, then re-pump the primer bulb. No priming is usually required if the engine is warm and has only been turned off for a few minutes.
c) For cold starts, the choke lever must be pushed up in the "off" (air-flow off) position to choke.
d) Grip unit around clutch housing or push down firmly on engine top. Pull out start handle gently until you feel it engage with engine. Pull handle quickly while stabilizing engine. If engine does not start the first 2 pulls, try re-priming the carburetor, and re-start.
e) Once the engine is started, and has started to warm (about 1 minute), Push choke lever down towards tank to turn off choke and run normally.
*To prolong the life of the pull unit (recoil starter), try to pull out handle until chord slack is eliminated and there is pull tension on the chord, before you make long pull. Also try to make shorter pulls rather than long pulls that pull chord out fully to stopper.
*The black thumb screw to the front of the throttle trigger is a limit screw. Turning the screw in clockwise reduces the amount the trigger can travel. This can be used for running for long periods at a set throttle.
2) Line Trimmer/Brush Cutter head. To see how to change between the line trimmer spool and the brush cutter blade, click on http://multipowertools.com/support/ChangingTrimmer-Brush.htm . To change line in the line trimmer spools, we have 3 types. See 1) http://multipowertools.com/support/ChangingLine.htm , or 2) http://multipowertools.com/support/ChangingLineG4.htm
or 3) http://multipowertools.com/support/spoolg5 for your spool.
3) Connecting. Make sure that the latch clicks in when connecting 2 sections of tube. Get them both lined up on the ground and then gently push them together holding the coupling ends of each tube (leaving the cutting head and engine resting on the ground). This allows the tubes to line up without requiring any effort. If any of the sections are off the ground it is much harder to line them up in a straight line and you get friction or binding as you push them together. The same applies when removing. When connecting, make sure the latch clicks before tightening the coupler. When disconnecting, the latch may be hard to push down if the hole in attachment tube is rotated against the latch. Simply rotate attachment tube slightly until it is easy to push down latch. The attachment tube drive shafts may slide out of tubes as you separate. This is NORMAL to allow them to be inspected. They can simply be pushed back inside the tubes when storing. Pictures of the connecting the tube are shown at http://multipowertools.com/support/coupling
4) Chain. Make sure to put the chain on the right way. Points on inside of chain facing forward at top of bar. Do not tighten the chain too tight - leave some play. It will stretch so you will have to adjust over time. Once bar and chain are clamped on finger tight, tighten small adjuster screw to tighten chain and get some tension on chain (the adjuster screw should be firmly pulled against the gear case housing and have no play. You can then tighten bar clamp bolt. If the chain can be pulled away from the bar so that tips of points on inside of chain just stay inside the track you are close to tight enough. The chain adjusting screw is an M4 metric bolt that is 1 1/4 inch long. There is usually no need to adjust the chainsaw head oil volume screw on the bottom of the gear case, even for first use. Just leave the factory setting. Chain is either Dokio or Carlton #N1C-BL low kickback chain.
5) Metric sizes. All the bolts and heads in the unit are METRIC (4mm, 6mm etc.). You can do most things with the tools that come with the unit.
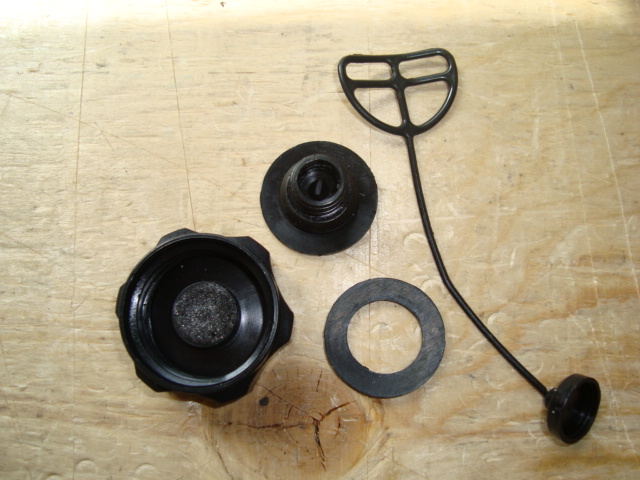
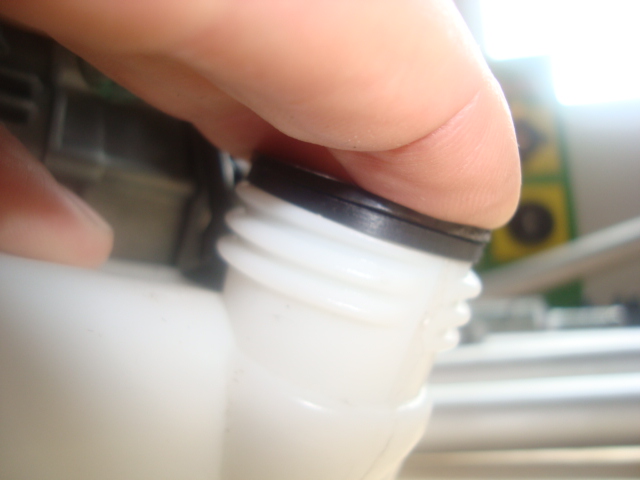
6) Gas Caps. The gas caps are vented. You may get some gas bubbles here but it should not leak. It is not necessary to over tighten the cap. Just make sure it is closed all the way and then give another 1/4 turn. Because the threads are so large, it is possible to incorrectly tighten it without actually having it threaded properly. If the cap is leaking, undo and try and re-thread it again. Also make sure that there is no debris on the gasket and that the cap is not on too tight (over-tightening can cause the cap to distort. You can also pry out the internal part of the cap from the outer cap (http://multipowertools.com/support/cap.JPG), and then flip the gasket over to get a fresh surface. You can also try putting the internal part with gasket (without outer cap) into tank mouth and checking seal from the side (http://multipowertools.com/support/capseal2.JPG).
7) Greasing. The heads can be greased every 50 hrs with general purpose grease or general purpose lithium based grease. Just use a regular general purpose grease gun.
Click on http://multipowertools.com/support/knownissues.htm for tips and some troubleshooting pointers.
| Specifications | |
| Weight/Length: | |
| Hedge trimmer: | Dry weight assembled is 7.4 kgs or 16 lbs. Length is 90" from tip to back of engine. |
| Chainsaw: | Dry weight assembled is 6.9 kgs or 15.2 lbs. Length is 82" from tip to back of engine. |
| Line trimmer: | Dry weight assembled is 6.8 kgs or 14.99 lbs. Length is 75" from tip to back of engine. |
| Brush Cutter: | Dry weight assembled is 6.8 kgs or 14.99 lbs. Length is 75" from tip to back of engine. |
| Engine Type: | 2 cycle, air cooled, vertical cylinder, double piston ring, full crank (bearings on both sides of crankshaft) |
| Bore x Stroke | 36 x 32 mm |
| Displacement | 33 cm3 |
| Idlke Speed | 3000 rpm |
| Max Speed | 11,000 rpm |
| Max Output | 0.9 kw at 8,500 rpm |
| Fuel/Oil Ratio | 25:1 |
| Fuel Tank Capacity | 700 ml |
| Carburetor | Diaphragm |
| Ignition | Flywheel Magneto CDI |
| Spark Plug | NGK BM6A or similar Gap: .028" (0.7mm), Thread Size: 14mm, Hex Size: 3/4" (19mm), Reach: 9.5mm (3/8"), Seat Type: Gasket |
| Air Filter | Semi - wet, quick remove |
| Starting method | Recoil |
| Cooling | Forced Air |
| Stopping | Slide Switch |
| Transmission | Automatic centrifugal clutch with bevel gear |
| Gearcase Ratio | 1.06:1 |
| Sound Pressure Level* | 91 dB(A) *ISO-11680-1 (Annex B) |
| Sound Power Level* | 106 dB(A) *ISO-11680-1 (Annex B) |
| Vibration Level* | Idle (front/rear) 2.32/2.78 m/s2 *ISO-11680-1 (Annex C) |
| Powered (front/rear) 3.64/3.89 m/s2 *ISO-11680-1 (Annex C) | |