READ THIS FIRST Box Contents Tips Trouble Shoot Chart Specifications Main Site
Support - Chainsaw
Expanded Instruction Manuals, Tips, Troubleshooting
|
Click here for PDF of the Manual Includes details, pictures, parts and specifications |
1) Power unit
2) Brake/guard assembly,
3) Tool set with chain file
4) Mixing bottle to mix gas with 2-stroke oil (1:25 or 1 part oil for 25 parts gas)
5) Bar, chain and chain cover
6) Manual
Pre-Use Assembly/Prep required:
1) Attach bar and chain. Secure hand tight with brake/guard assembly and 2 nuts. (5 minutes)
2) Adjust chain tension with chain tension screw. (2 minutes).
3) Add bar and chain oil to reservoir (forward reservoir with chain symbol)
4) Check that all screws and bolts are tightened firmly.
1) Starting and Running. Pull out choke when cold and pull couple times on start chord. When it almost fires, push in choke and pull again. Priming is not required. If your unit is not starting easily, does not start, or cuts out during operation, it is most likely caused by a fouled spark plug - even if the plug looks good or has only been run for a short time. The unit is designed to run optimally at FULL throttle all the time with a 1:25 mixture and you will not burn off the oil on the plug if you always run at low throttle.
To prolong the life of the pull unit (recoil starter), try to pull out handle until chord slack is eliminated and there is pull tension on the chord, before you make long pull. Also try to make shorter pulls rather than long pulls that pull chord out fully to stopper.
2) Metric sizes. All the bolts and heads in the unit are METRIC. You can do most things with the tools that come with the unit.
Specifications
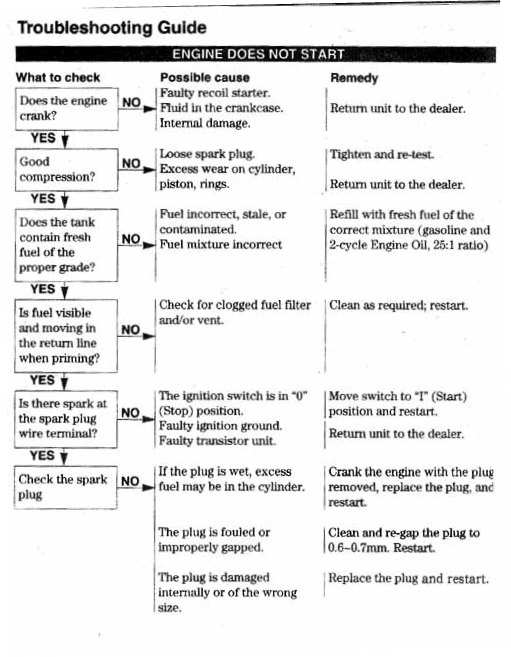
1) Unit does not start. Check the following (and also see the Trouble Shooting Chart at bottom of this page) :
1) Is the
choke lever pulled out for cold and pushed in when warm?
2) Did you check the stop switch in not in off position?
3) Do you have enough gas in the tank?
4) Do you have a good spark plug? A new plug is just a few dollars at a Home
Depot or similar, and may save a lot of time. With 2 cycle engines, the oil in
the mix will build up on the plug - especially if you unit sits between uses. it
can happen in a short amount of time. Even if your used plug shows a spark, is
recent, or has been cleaned, we would suggest having a new one on hand to
eliminate the plug as the problem. If you want
to check the spark ignition system, remove the plug from engine, connect the plug wire
to the plug and ground the side of plug to metal engine housing using pliers
with plastic grip handles so you don't get a shock. Pull the starter cord and
watch the plug for a spark jump. If you have spark then the ignition system is
working but that does not necessarily mean that your plug is good.
5) If you have all above working, last area may be mix screw out of adjustment. You can try and fix this by adjusting the carburetor fuel mixture screw (the one with spring). Try undoing the screw to open up the inlet (richer mixture) and allow more gas to blow through. If it starts, even just for a short time, move the screw a little bit and see if the different position helps. Once it is running you can turn the screw clockwise for a leaner mixture until you get better rpms at full throttle.
2) Throttle trigger not connected. The wire end where it engages the trigger is also easy to get to. If you turn saw upside down and look at the end of the handle grip, you will see a phillips screw that is holding down the black grip cover that covers the top of the grip and trigger lock. Once this is removed, you can lift up the end of the black cover and you will be able to see the throttle trigger interface with the wire. If this is not engaged there, you should be able to just slip it back in to the little hole on the side of the trigger. Then just make sure the spring wire for the trigger lock is pushed back under the catch on the trigger lock so that the trigger lock has spring. Then slip the black cover over the handle grip front end first and secure it with the phillips screw. The black cover holds the trigger wire against the trigger.