READ THIS FIRST Box Contents Tips Patching Specifications Deflating and Storage Main Site
Support -
Inflatable Synthetic Rubber RIB (Slat) Boat by Sea Walker
Expanded Instruction Manuals, Tips, Troubleshooting
1) Boat, pump, aluminum oars, patch kit, valve wrench, heavy duty storage bag
Pre-Use Assembly/Prep required:
1) Inflate boat and attach seat and oars. 10 minutes
Place the seat into the receptacles on the boat before fully inflated or pressure will make the seat hard to install.
| Model | Overall length (cm) | Width (cm) | Tube Diameter (cm) | Max Person | Max Engine Power (HP) | Chambers | Net Weight (kg) | Stowed Dimension (cm) |
| PB-230 | 230 | 132 | 36 | 3+1 | 4 | 2 | 25 | 97x60x29 |
| PB-250 | 250 | 132 | 36 | 3+1 | 4 | 2 | 23 | 97x60x29 |
Fabric
 The
Sea Walker boats use 1,100 denier polyester fabric, which is specially coated on
both sides with solid layers of thick PVC rubber. The final product is extremely
heavy duty and has a look and feel
The
Sea Walker boats use 1,100 denier polyester fabric, which is specially coated on
both sides with solid layers of thick PVC rubber. The final product is extremely
heavy duty and has a look and feel Seams and Glue
 Sea
Walker boat seams are overlapped a full inch and reinforced with seam tape, both
outside and inside for extra added protection. To maximize bonding, polyurethane
based glue is used. Polyurethane glues offer high durability and protection
against heat and salt water.
Sea
Walker boat seams are overlapped a full inch and reinforced with seam tape, both
outside and inside for extra added protection. To maximize bonding, polyurethane
based glue is used. Polyurethane glues offer high durability and protection
against heat and salt water.
Baffles
The inter baffles on our boats not only keep
individual air chambers completely sealed for safety but they also have a
flexible design which works to equalize air pressure between cone parts.
Halkey-Roberts Valve
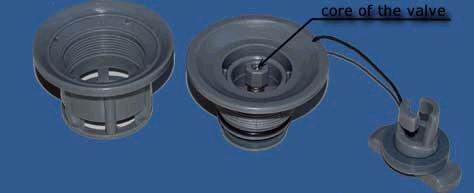 Sea Walker
Boats use heavy duty Halkey-Roberts(H-R) air valves which have three parts.
There is an inner base, outer valve assembly, and a valve cap. The inner base
sits inside the tube to provide backing and a seal when the outer valve assembly
is screwed into the base. For inflation, the valve should be locked to allow air
to only flow one way into the boat. The valve is locked by pushing and twisting
the valve core so that the core of the valve pops outwards. For deflation, push
in and twist the core of the valve until it locks. Air can now flow out.
Sea Walker
Boats use heavy duty Halkey-Roberts(H-R) air valves which have three parts.
There is an inner base, outer valve assembly, and a valve cap. The inner base
sits inside the tube to provide backing and a seal when the outer valve assembly
is screwed into the base. For inflation, the valve should be locked to allow air
to only flow one way into the boat. The valve is locked by pushing and twisting
the valve core so that the core of the valve pops outwards. For deflation, push
in and twist the core of the valve until it locks. Air can now flow out.
The seal between the boat fabric and valve lip can be improved with a thin film of Vaseline. The o-ring on the outer valve assembly can also be spread with a small amount of Vaseline to provide a better seat.
Deflating and Storing
 STEP 1 :
Disassemble and deflate boat
STEP 1 :
Disassemble and deflate boat
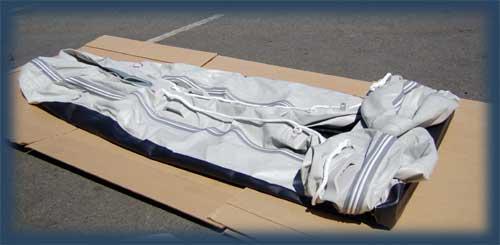
Remove the oars from both sides of the boat.Deflate all air chambers.The valves
should be unlocked by pushing and twisting one quarter turn.Leave H-R valves
open. Remove the seat. Fully deflate boat by attaching foot pump to each of the
valves.
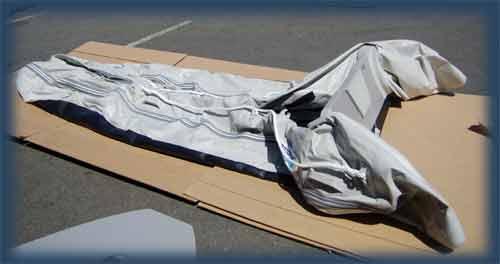
 STEP
2 : Fold both sides of the boat
STEP
2 : Fold both sides of the boat
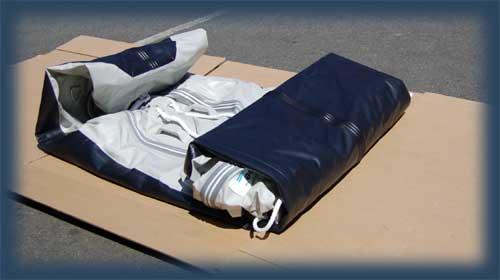
Fold both end cones over transom. Fold both sides of the boat as shown on the
picture. You want the pontoons to fold in so the entire package is not wider
than the transom .
 STEP
3 : Fold transom
STEP
3 : Fold transom
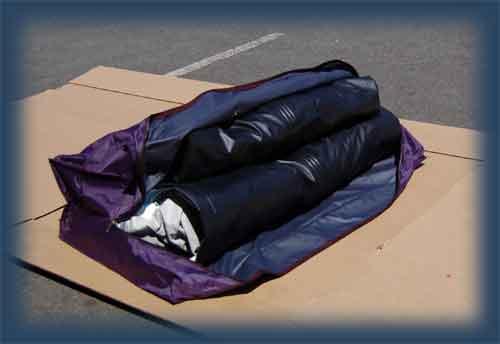
Roll forward front bow. Fold front bow under main chamber. Fold transom. Roll up
tightly.
 STEP 4 :
Place folded inflatable into storage bag
STEP 4 :
Place folded inflatable into storage bag
Place folded inflatable boat and accessories into storage/carrying bag.
PVC patch
Prep
Mark out and cut your PVC patch . Cut the patch to extend at least two inches
(40-50 mm) beyond the tear. Round the edges, square cornered patches are more
likely to catch and peel than rounded ones.
Trace the outline of the patch on the damaged surface with a pencil. Lightly
buff both contact and gluing surfaces, using fine sandpaper, about 180-grit, or
a roller rasp. Just buff the fabric shine off - don't rasp down to the threads.
Clean the buffed surface with the lint free towel or pvc cleaner .Allow areas to
dry .
Application
BEFORE YOU START ANY GLUEING PLEASE NOTE YOUR WORKPLACE NEEDS TO BE WELL
VENTILATED, WARM AND DRY. IF THE AIR IS HUMID DON'T TRY TO USE THE ADHESIVE AS
IT WILL BLOOM. DO NOT USE A GAS FIRE OR NAKED FLAME HEAT SOURCE AS THE SOLVENTS
ARE HIGHLY FLAMMABLE. DO NOT USE THE ADHESIVE IF IT HAS BEEN MIXED FOR MORE THAN
4 HOURS. IF THE DAMAGE TO YOUR TUBE IS MORE THAN 15MM IN ANY DIRECTION AN INSIDE
PATCH NEEDS TO BE APPLIED. THE PROCEDURE IS THE SAME BUT IS MADE MORE DIFFICULT
BECAUSE YOU ARE WORKING ON THE INSIDE OF THE TUBE
Apply one even coat of adhesive to each surface. Although the material may be
bonded while wet, optimum results are achieved by waiting 3-5 minutes before
bonding the surfaces together. Carefully align the patch and press both surfaces
together. Apply pressure to the entire glued surface using a roller. Roll every
millimeter of patch in multiple directions, working from the inside to the
outside of the patch. You must make sure that there is no air trapped between
the surfaces.This step is important because it forces air bubbles out and helps
the two pieces of material bond. Use a lint free towel and PVC Cleaner to wipe
up excess glue. Complete curing time takes approximately 24 hours.